2023 Update: RGB-Pi OS 4 seems to have resolved all this nonsense once and for all. I suggest just updating to that OS and forgetting about trying to get OS 3 to display correctly if you’re having issues.
RGB-Pi is an excellent pixel-perfect emulation solution which gives proper 240p output via SCART to RGB-compatible CRT monitors.
Although compatibility is high out-of-the-box, many CRT monitors (especially professional/non-consumer models) will not accept the csync signal that RGB-Pi outputs. There are two different issues that can happen but both involve the same problem – you may have issues with only the RGB-Pi menus, only with emulation, or with both.
If your screen looks like any of the following pictures, this guide will most likely will fix your problem:
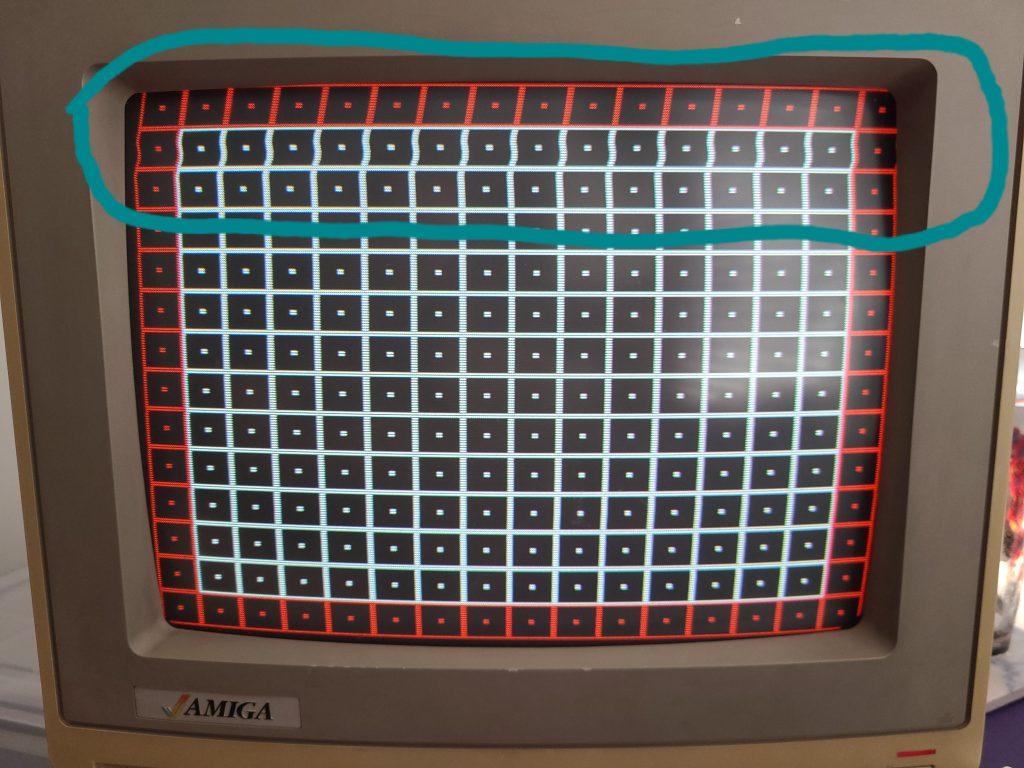

The RGB-Pi OS has two different “configurations” for displaying 240p content. The first displays the user interface (the menu of RGB-Pi where you select your game or change settings) and the second config is for displaying 240p emulation. Sometimes only one of these configs will have sync issues on your TV, sometimes both of them will.
OS/UI Sync Issues
If you have sync issues with the main menu of RGB-Pi OS, you need to read this section, otherwise skip it.
To fix sync issues happening on the main menu of RGB Pi (see 2nd image above), you will want to edit a file called config.txt. This can be accessed any of the following ways:
- Plugging in your RGB-Pi micro-sd card into a Windows or Linux-based computer
- Connecting to your Pi via SSH
- Connecting to your Pi via SCP/SFTP
In method #1, you will find it at the root of the sd card. In methods #2 and #3, you will need to browse to the /boot directory to find it.
Once you open the file with a text editor, you will see this on the first line:
hdmi_timings=320 1 10 30 40 240 1 3 4 6 0 0 0 60 0 6400000 1These are the settings used to generate the video signal of the RGB-Pi OS. If you are wondering what these numbers all represent, here is a handy chart in order of each setting’s appearance for hdmi_timings:
| h_active_pixels | h_sync_polarity | h_front_porch | h_sync_pulse | h_back_porch | v_active_lines | v_sync_polarity | v_front_porch | v_sync_pulse | v_back_porch | v_sync_offset_a | v_sync_offset_b | pixel_rep | frame_rate | interlaced | pixel_freq | aspect_ratio |
| 320 | 1 | 10 | 30 | 40 | 240 | 1 | 3 | 4 | 6 | 0 | 0 | 0 | 60 | 0 | 6400000 | 1 |
The only two numbers we care about here are h_sync_pulse (4th number in the list) and v_sync_pulse (9th number in the list). These are the numbers that control most of the sync deformations you encounter. Now that you know where to find these numbers, continue reading Adjusting the Sync Pulse below to learn how to adjust these numbers and fix your menu sync.
240p emu sync issues
If you have issues with sync during game emulation, you need to read this section, otherwise skip it.
Each console RGB-Pi is capable of emulating has its own configuration settings to produce the correct pixel-perfect 240p picture on a CRT monitor. Usually all that needs to be adjusted to fix a sync deformation is the V-Sync or H-Sync pulse value. These values can be found in the following file:
NOTE: This file is only accessible via SSH/SFTP!! You won’t find this file on the SD Card!
/home/RGB-Pi/data/timings/console-timings.txtIn this file you will see a line for every console, both 60Hz and 50Hz seperately. They are separated because 50Hz requires a different amount of horizontal lines to be displayed. You may have already discovered before reading this guide that playing your games at 50Hz fixes the sync issues – however that is not a desirable solution for most people. The actual solution will be to change the sync pulse lines for every console in this file. Fortunately they all use the same default values, so you don’t have to manually test each console for different numbers. Pick one console you can test a ROM with (I picked snes60 for 60Hz SNES emulation).
| console | H Pixels | Scanlines | Frame Rate | H Pos | H Zoom | V Pos | H Front Porch | H Sync Pulse | H Back Porch | V Sync Pulse | H Frequency |
| snes60 | 1920 | 240 | 60.00 | 0 | 0 | 0 | 48 | 192 | 240 | 5 | 15734 |
If you need to understand how to adjust the pulse numbers, read the section Adjusting the Sync Pulse below before continuing.
Once you find the right pulse numbers on your test console, copy it to every other console in the file. You can do this with a simple Find/Replace function in the text editor. For V-Sync pulse be careful not to just replace “5” because there are other numbers that contain 5’s like the pixel clocks. Try searching “240 5” and replacing with “240 x” where x is your sync number. This will only touch the v-sync pulse.
Adjusting the Sync Pulse
Once you know where to adjust the pulse numbers, start by adjusting V-Sync Pulse first. Lower the number down from the default of 5 (for 240p) or 4 (for RGB-Pi OS) by increments of 1. Test after each time. In order to test, you must REBOOT the RGB-Pi OS using the START menu REBOOT option. Do not simply unplug the Pi, this may reset your changes. If you are testing the OS for sync issues, just wait for it to finish booting and see if your sync issues are gone. If you are testing for emulation sync issues, boot into the console you edited in console-timings.txt and see if the issues are gone.
If vertical sync adjustment doesn’t solve your issue, try adjusting the h-sync value in increments of 5-20 using the same process.
If you get rolling sync from decreasing the values, try increasing them instead.
Thanks Andy, I found your post very helpful as I use my RGB-Pi cable with a JVC monitor that requires adjusting the synch pulse.
Your instructions seem to fix all deformations but the grid used in settings to position emulators still shows deformed. Also , the UI shows with more overscan on top and bottom than it did before. I can email you some pictures.
Do you know by any chance how to reposition the screen image of a specific emulator?
The grid uses a different sync pulse, I never figured out which one to change to fix it.
Specific emulators can be changed by finding the config lines for each system in this file:
/home/RGB-Pi/data/timings/console-timings.txt
that file isn’t showing up for me no matter what I use to search for it.
It’s not accessible on the user partition, you have to SSH into your Raspberry-Pi over your network in order to access the system partition where those config files are located. I have updated the blog post with this note to make it clear.
thank you!!
First of thank you so much for your precious info, I got the sane pvm 2043MD with same deformation paired with rgb pi, pvm 1444qm and 1442qm do the same issue. May I know what are your sync pulse setting?
The RGB-Pi developers don’t seem very interested in testing their product on PVMs. Almost everyone I know who has tried the RGB-Pi on a PVM has had problems.
I can’t give you an exact setting that will work, you will have to experiment for yourself. If you find numbers that work please let me know what they are and I will add them to this guide. Thanks.
Live used a mac and a windows pc to try finding the console-timings.txt and even searched with hidden files enabled. It’s nowhere to be found on the microsd nor usb storage where all my roms are saved on.
It’s not accessible on the user partition, you have to SSH into your Raspberry-Pi over your network in order to access the system partition where those config files are located. I have updated the blog post with this note to make it clear.
This guide is exactly what I waslooking for.
I’m not quite there yet. I’m have a vertical problem and possibly horizontal.
It’s a videocolour CRT a59ecy13x01
I am really sorry guys but under the home folder, there is only the pi folder. I cannot seem to locate console-timings.txt even though I have connected to my Pi4 RGB-Pi OS4 (beta 24) using ssh. I am trying to fix random jumps on my CTR tv, connected using rgbpi scart.